Monday, 22 June 2020

Kheerer Luchi / Bengali stuffed sweet puri


    Kheerer Luchi ,as the name suggests, is a luchi (puri) stuffed with khoya stuffing and then soaked in thick kheer gravy. In Bengal, by Kheer, we usually mean, thickened milk. 

I have been planning to try this recipe since long,but was a little apprehensive at first, that the luchis might not come out well. 
But then somehow mastered the courage and decided to give it a try. The result was more than I expected. The dish came out really really tasty with soft luchis soaked in thick kheer. 

Believe me, it was not as difficult to make, as I was thinking at the begining 😄. The process,of course, is a bit elaborate. But,I have tried to make it as simple as I could. Just follow my recipe, and you can easily make those divine tasting Kheerer Luchis at home. 

The original recipe, as the name suggests, calls for mava/ khoya stuffing. In did not have khoya at home. So, I made my own version of khoya 😃, which tasted no less than the mava stuffing. You can,of course, go with the traditional method of mava/khoya stuffing.

Without wasting more time in describing it, let us start preparing the dish. I will describe the recipe step by step, making it easier to comprehend.


 Things required : yields about 18 to 20 luchis

  1. Full cream milk -  3 litres plus 1 cup
  2. White vinegar - 2 tbsp
  3. Maida (All purpose flour) - 2.5 cups 
  4. Sugar - 2 cups ( adjust according to taste )
  5. Milk powder - 2 tbsp
  6. Oil - to fry and 2 tbsp extra for kneading
  7. Cashew paste - 2 tbsp (gives the kheer a nutty and thick texture )
  8. Pista - finely chopped or ground - 2 tbsp (for garnishing )
  9. Green cardamom - 2/3 (powdered) to add to the milk,while boiling

Process :

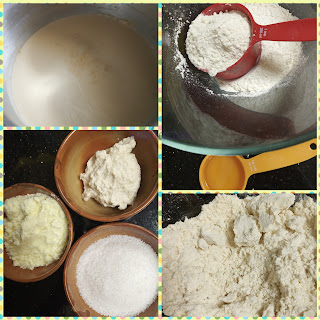
  1.  in a deep saucepan, bring 2 litres of milk to a boil. Let it boil on a low flame and reduce it to a condensed milk like consistency. Add crushed green cardamom (choti elaichi) while boiling.
  2.  For the stuffing. In another saucepan, bring the rest 1 litre of milk to a boil. When it boils, add the vinegar and let the milk curdle. Switch off the flame. 
  3. in a clean cotton cloth, strain the curdled milk, wash it a little and hang for at least 3/4 hours in order to get your chunk of paneer without any extra moisture.
  4. Mash the paneer with your hands. Blend it in a blender jar along with 3/4th cup of sugar and a cup of milk. You will get a smooth thick paste.
  5. Heat a non stick pan and cook this paneer paste on it over medium flame. Cook till all the liquid evaporates and you get your crumbly stuffing ready. 


 This will be your stuffing for your Kheerer Luchi and as I mentioned earlier,this is equally good in   taste. You can always go for mawa stuffing,if you like. You can prepare the stuffing one day prior,so   that you can make the dish faster.

While the milk is boiling, keep stirring it occasionally. 

Let us prepare the maida in the meantime :

  1. In a big mixing bowl, add 2 and a half cup of maida and 2 tbsp oil and knead with your hand,till it is crumbly.


 Make a smooth and firm dough by using warm water,little by little. When the dough is ready, rub a little oil over it and keep aside for an hour.


 Check the consistency of the milk. When it is reduced to about a third of its original quantity, add the sugar ,cashew paste and milk powder, stir well and mix. once it is ready, switch off flame and let it cool.


You can understand from this picture...the upper mark of milk shows,how much it has been reduced to.

Now for the luchis...knead the dough once again for a minute and make small balls from it. There should be about  18 to 20 luchis from this dough.


Start rolling each Luchi, put a teaspoon of stuffing on it, fold it like momo and then again roll it to the size of Luchi /Puri. 


  In the meanwhile, start heating oil in a kadhai. You have to deep fry the luchis. When the oil is hot enough, start frying the Luchis one by one. When luchis are light brown on both sides, take them out and keep in a wide serving bowl or tray. Try not to stack the luchis one above the other. Or else, when soaked in kheer, they tend to get stuck to each other . 


Getting fried.


The fried luchis, before adding kheer.


When all the luchis are done, arrange them well on a wide dish or serving tray and pour the kheer over them. See that all the luchis are soaked equally. Garnished with chopped pista. Refrigerate for 2/3 hours and serve.



Thursday, 18 June 2020

kanchakolar Koftar malaikari / Green Banana Koftas cooked in coconut milk gravy


Kanchakolar kofta or green banana kofta curry is a very common item in any Bong kitchen. Usually, no part of the Banana tree is discarded...Each has its own use. The stem, the blossom and of course the fruit are very much savoured in our kitchen. Banana leaves are used in some types of cuisine and is also used for serving food. They contain lot of health benefits. They are rich sources of calcium, potassium, vitamin C, Iron to name a few. 

Green banana is used in a varied way in Indian cuisine. Even the peel of boiled green banana can be made a delicious curry.

As I have mentioned already, koftas made with green banana ,known as Kanchakolar kofta is a favourite among Bongs. Usually,the bananas are boiled,mixed with some spices,fried into koftas and made a curry using different spices. There are usually two versions of this curry...the veg one is made with coriander,cumin and ginger paste and onion paste is added in the the non veg version. In Bengal, Onion and garlic are considered non vegetarian.

This time,while making these koftas, I thought of making it in a little different style....not the usual one described above 😀. Than I came up with the idea of cooking them in a mild gravy,which will be milk based and a little sweetish in taste. So, I made this Malaikari of the raw banana koftas,the main ingredient of which is, coconut milk. I have added a little cashew paste to make the gravy thicker and creamier. I have used very little spice here...and believe me,it came out really really tasty . 


So,here is the recipe.....

Ingredients : 

  • Green / raw banana - 4
  • Potato - 1 medium
  • Besan / Gram flour - 2 tbsp
  • Onion - 2 medium and 1 big
  • Ginger paste - 3 tsp
  • green chillies - 6/7 (slit)
  • Chilli powder - half tsp
  • salt and sugar - to taste (the gravy should be a little on the sweeter side)
  • Thick coconut milk - 1 cup (I have used nestle coconut milk powder...mixed 2 tbsp in a cup of warm water +normal milk)
  • Unsalted cashew - 10/12 (soak in water for an hour and then grind to a fine paste )
  • Ghee - 2 tsp
  • Oil - to fry and to cook ( Usuallly,these koftas are deep fried. But I made them in an Appe pan,which reduced the amount of oil used to a great extent. In an appe pan, you just brush with very little oil and get equally good soft koftas ) 

Process.....

  • Cut the bananas and the potato into half and boil them in pressure cooker. Discard water ,cool and peel them. Mash them and keep aside.
  • Chop 1 medium sized onion very finely
  • In a big bowl, mix the chopped onion, 1 tsp ginger paste, salt and a little sugar, gram flour, chilli powder and the banana potato mixture. You can add 1 tsp finely chopped green chilli also. Now, with hand or a hand masher,mix all the ingredients nicely and make a smooth dough.
  • Make small balls from this mixture and fry them. Usually,they are deep fried. I have used Appe pan,to reduce the amount of oil.
  • Get the coconut milk ready.
  • Cut the big onion into thin slices , make beresta (deep and crispy fried onion) and keep aside.
  • Cut the other medium sized onion and boil it in a little water. after it is boiled,cool it and grind it to a fine paste. as this dish is whitish in colour ,we shall be using boiled onion paste,so that,we don't need to cook it for long and make it brown.


Let us start the cooking now...

  • Heat 1 tbsp oil and 1 tsp ghee in a pan.
  • Add the boiled onion paste and fry for a couple of minutes.
  • Add the remaining ginger paste,salt and sugar and cook for a few more minutes,till the raw smell of ginger is gone.
  • Add coconut milk,stir and cook for 2/3 minutes.
  • When it starts to boil, add the cashew paste and let it cook. Add a little warm water...depending on what type and quantity of gravy you want. The gravy should not be runny,rather,it will be thick and creamy.
  • Check seasoning...add salt or sugar,if needed.
  • Add the koftas and let it boil for a couple of minutes.
  • Add the remaining 1 tsp ghee and slit green chillies. Cover and switch the gas off.
  • after 2/3 minutes of standing time, pour the malaikari into a serving dish, sprinkle the beresta over it and serve.
  • This dish goes very well with naan, paratha,rice or pulao.


Wednesday, 17 June 2020

Garlic Butter Naan ( on tawa )/ supersoft naans /step by step recipe


Here is a simple recipe of Garlic Butter Naan ,which can be made easily and without any oven or tandoor. It can be made it with a few simple ingredients,which are usually available in our kitchen. It is packed with taste ,nutrition and freshness of home cooked food and the flavour of fresh garlic.

It tastes no less than the one from your favourite restaurant and much cheaper too, but unlike restaurant bought naans,it remains soft for longer. I had one left in my fridge for three days, and even after three days,it was as soft as fresh. Just a few seconds of reheating was needed. 

If you don't like the garlicky smell, you can make plain naan, methi naan or even mint naan with the same dough. simply brush plain butter for plain naan, crushed mint mixed butter for mint naan or crushed methi leaves mixed butter for methi naan. 

These naans can be prepared beforehand and kept in fridge....only you have to put a piece of aluminium foil or butter paper in between the rolled naans. Thaw them before eating and cook as described below.

Without wasting more time, let us start preparation for our supersoft garlic butter naa
To make our naan, we will need.....

  • 3 cups maida...about 400 grams (all purpose flour) and a little extra (you may need while kneading)
  • 1 teaspoon salt
  • 1 cup Lukewarm milk (about 8 ozs)
  • 2 teaspoons sugar
  • 2 teaspoons active dry yeast
  • 3 teaspoons plain yoghurt (dahi)
  • 3 tbsp any white oil....soya,sunflower,canola or any
  • 2 tbsp crushed or grated garlic ...about 12/14 flakes
  • 1 tbsp nigella seeds...to sprinkle
  • half a cup finely chopped coriander leaves or cilantro ...to sprinkle
  • 3 tbsp butter (room temp) ....to brush over the naans

Gadgets you will need... non stick pan or iron skillet , a spatula, basting brush and a chapati wire mesh

Step 1.... prepare the dough

  •   Take a big bowl and sieve the flour and salt in it and keep aside.
  •   Add the sugar and yeast with the warm milk and rest it in a warm place for about 10/15 minutes   or till   the yeast activates. I preheated my microwave for 30 seconds and kept the milk in it. it   worked out   very well. You will know,when it is bubbly and frothy on top.
  • Once the yeast is activates, transfer the mixture into a bigger bowl and add the yoghurt and oil in it. mix lightly.
  • Add this liquid to the flour and salt mixture and start kneading. 
  • Add half the garlic too.
  • Knead well. If it is too sticky, you can add a little more flour.
  • The dough will be sticky, but do NOT add too much flour to make it dry and firm. Add just as much flour,as needed for making the dough not too sticky.
  • Knead the dough for a few minutes more . Once it is done, rub it with a little oil and keep it in a warm place ,covered . Here again, you can make use of your microwave oven.
  • Let the dough rest for at least 2 hours. It will become double in size, as it has become aerated. Punch it lightly to release the air and knead again for 2/3 minutes.
  • Make equal sized balls from the dough. Your dough should yield about 6 or 7 naans. Your dough will tend to stick to you hand because,it is very soft. 
  • Cover the balls with a wet towel and keep aside in a warm place for 10/15 minutes.
  • In the meantime, prepare your garlic butter.

Step2 .... Garlic butter

  • In a small glass bowl , melt the butter in microwave (30 secs) . when it melts,add the rest of the garlic and mix well. Keep it aside along with basting brush. you will need it to brush on the naans,when they are ready.

        Let us start preparing the naans. 
        I made these naans on non stick pan. You can make them on an iron skillet too.
 

Step3 ...Rolling the naans

  • Roll each ball into an oval shape. Apply a little oil on the balls before rolling. Naans will be about 8/9 inches long and 5/6 inches wide.        
  • Rub a little water on one side of the naans, sprinle some nigella seeds over it and transfer the naan to the frying pan / skillet. 
  • Let it cook for a couple of minutes. You will see bubbles appear on the surface of the naan.
  • Flip it and cook for a few seconds on the other side too
  • Transfer the halfcooked naan onto the wire mesh and roast lightly over direct flame. Cook on both sides. Brown spots will start appearing and it will get cooked well from inside. It takes about 20/30 seconds.  Prepare all the naans in the same way.
  • Transfer the naans to a Dish /tray and generously brush garlic butter on it. Sprinkle some chopped cilantro on top.
  • Your garlic butter naan is ready to serve. Enjoy it with a vegetarian or non vegetarian dish of your choice. 


Sunday, 7 June 2020

BHAPA DOI / BENGALI STEAMED SWEET CURD (WITHOUT OVEN)


Bhapa Doi  or Steamed curd is a slight variation from the traditional Bengali Mishti Doi recipe. I tried this recipe and trust me,it came out really delicious . 

It is very simple to make, tastes as good as Mishti doi (Lal Doi ) . I did not use any oven to make this.You will need only gas burner and a pressure cooker and very few ingredients for this recipe. It is less effort and time consuming, than the lal doi or mishti doi. 

I will describe the recipe in a very simple way,so that,it will be easy even for a very nauvice cook to try it.
 
Without wasting any more time ,let us start preparing......

Ingredients : 

  • Sweetened condensed milk - 1 tin (room temperature)
  • Normal sour curd - 2 cups (1 cup: 200 ml approx...room temperature )
  • Curd Condensed milk ratio to be adjusted according to taste and sourness of the curd.
  • green cardamom powder : half teaspoon

Process : 
 
  • In a deep bowl, beat the curd for a few minutes,until it is smooth and without any lump. 
  • Add the cardamom powder and the condensed milk and beat to a smooth thick batter again. 
  • Beating should be done with hands. Use of beater or mixi will make it runny.
  • Sit the pressure cooker on gas burner . flame should be high. 
  • The bowl,in which you are going to steam the curd,should fit in the pressure cooker. Otherwise, you may use a big and deep vessel with cover,in place of pressure cooker.
  • Pour water in the pressure cooker or the big vessel to a level,so that your cooking bowl is submerged in water only to the lower level. 
  • Cover and bring the water to a boil.
  • In the meanwhile, grease the cooking bowl lightly and pour the curd condensed milk mixture in it.
  • Keep a steel dish or separator in the boiling water. This will keep your cooking bowl steady while steaming.
  • Now cover the cooking bowl and carefully place it on the separator. 
  • Remove the vent weight (whistle) from the pressure cooker lid. Cover the pressure cooker and let it steam for about 15 minutes.
  • If you are using any other vessel in place of pressure cooker, the cover should be heavy. You can put some weight over the cover.
  • Your Bhapa doi should be ready in 10 to 15 minutes. If needed, steam for 2/3 minutes more. Remember, if you steam for too long, it might turn hard.
  • switch the burner off. The contents might look slightly soft. don't worry. Let it cool down. Then refrigerate it for 3/4 hours. Then Bhapa Doi will be completely set.
  • Serve chilled and enjoy the delicious taste of Bengali Bhapa Doi. 

Note :
  •  Bhapa doi is usually whitish in colour, It is not the usual mishti doi or Lal doi. Still, if you want to give it a reddish colour, you can add 3/4 tablespoon of caramelized milk with the curd condensed milk batter. 
  •  Heat 1 tea spoon ghee. add 2 tea spoon sugar in it and keep stirring until the sugar melts and takes a dark brown colour.
  • Add half a cup of milk and bring it to a boil. 
  • Cool it a little. It should be warm,not hot or totally cold. 
  • Than add it to the curd condensed milk mixture. 
  • You can also make this doi in microwave. In a large microwave safe bowl/ container, fill some water so that , the bowl with curd mixture  is submerged about 1to 2 inches only, when you place it in the bigger bowl . Bake it for about 15 minutes at 200 degrees.
  • you can garnish it with chopped nuts or strands of saffron or raisin....anything,according to your choice. 
  • Enjoy.


Saturday, 16 May 2020

Kheer kamla/Kamla lebur payesh / Orange kheer


Kheer kamla, kamla lebur payesh or orange kheer, whichever way you put it, is a very flavourful and yummy dessert,very unique to West Bengal. 

At times,when oranges are abundant in the market and you have had enough of them raw, you might,sometimes think,what shall I do with these oranges now ? This recipe will come very handy at such times. Just give it a try,you will love it's taste and aroma.

This recipe does not require too many ingredients or too much of effort. The two most important things to keep in mind are: 
1.select oranges,that are fresh, juicy and sweet . Otherwise your kheer may taste bitter at times,if the oranges are not sweet.,
2. Careful peeling of the segments. I will demonstrate the peeling procedure by the help of pictures. I assure, you will be able to make this kheer easily. 

I made this kheer with 2 litres of full cream milk and 4 oranges. Other ingredients you will need are, sugar according to taste and a handful of chopped cashew or mixed nuts and about a tbsp of fine aromatic rice.

Bring the milk to boil in a deep vessel, on high flame. When it starts boiling, reduce the flame to medium and keep stirring occasionally. After the milk is reduced to 3/4th, wash the rice (basmati or gobindobhog) and mix it in the milk.

Let the rice get cooked in milk. You have to reduce the milk to a little less than half. 
In the meantime,peel the oranges and keep aside.
Separate each segment of the oranges, with the help of a knife, peel the tissue like cover from them and also remove the seeds. You only need the pulpy part present inside. If needed,with the knife, remove the tissue cover from the lower part of the segments. Make small pieces of the pulp and keep aside.


 Keep stirring the milk and rice. Check if the rice is fully cooked.When the rice is cooked,add sugar according to your taste. Let it boil for a few minutes. 

When the kheer reaches desired consistency, add the cashew / nuts,switch the gas off and keep aside,covered. Let it cool. 

When it is completely cold,add the orange pieces and mixed with a gentle stir.
Cover and refrigerate. 

Your orange kheer is ready. You can serve it chilled. My recommendation is to keep it refrigerated for at least 10/12 hours,so that,the flavour of orange gets nicely infused into the kheer and gives it the tangy sweetness that makes it unique.


Enjoy your kamla lebur payesh / kheer.

Note :  Traditionally,this recipe is made without rice. I have added the rice in order to give it a little volume. You can omit the rice from the recipe,if you wish.